

In this post we show, step by step, the way to create simple CVI programs. This post will allow you to take your first steps using this wonderful programming environment.
1st Step - Installing CVI on you computer
If you did not purchase a CVI licence from National Instruments you will need to make due with an evaluation version that expires after a couple of weeks. You can download the latest version from here (click the Download Labwindows/CVI link, fill out the form and follow the instructions).
2nd Step - Starting CVI
Launch CVI and choose "New Project"

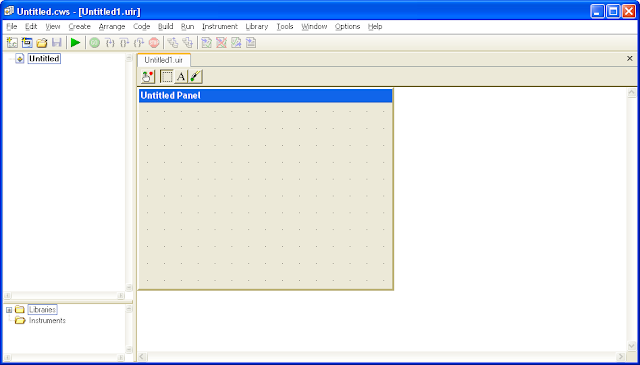
This will open CVI's main working window.
3rd Step - Designing the Graphical User Interface (GUI)
When we want to create a program that has a visual interface our program creation process starts with the design of the interface window itself - the window that the users of your application will see when they launch it (this is true whether we are using CVI, Microsoft Visual Studio or any other development system). This window we are creating is called the "Graphical User Interface" (GUI), or simply the "User Interface" (UI or UIR), and it is important that you keep these terms in mind. To start designing the interface window click the "New User Interface" icon on the upper left side of the menu bar (usually the second one from the left) or click File->New->User Interface.

This opens the designing area where we can work on creating the UIR.
In CVI every interface window is called a Panel and we shall embrace this terminology throughout this tutorial. In the design area you can see how the panel will look like when the program is launched (at the beginning of the design process the panel is completely empty). The items we place on the panel are called Controls as they are used by the users to control the program. Right clicking on an empty area of the panel opens a control selection menu where we can select the control we want to add.

In CVI every interface window is called a Panel and we shall embrace this terminology throughout this tutorial. In the design area you can see how the panel will look like when the program is launched (at the beginning of the design process the panel is completely empty). The items we place on the panel are called Controls as they are used by the users to control the program. Right clicking on an empty area of the panel opens a control selection menu where we can select the control we want to add.
for the purpose of this tutorial we will create a very simplistic program that present the user with a button he/she can press. Pressing that button will turn on a LED light and place a number in a numeric field. Let's start adding the controls we need: a button, a LED and a numeric control:
Right click on the panel, select 'Command Button' and then select the simple square button design. The button will appear on the panel and you are free to move it around and re-size it (this is true for most of the available controls). Remember, this button will be pressed by the users to change the states of the LED light and the numeric, this is in fact the only control that the user should interact with in our program.

Right click on the panel, select 'LED' and then select one of the optional designs. The LED lamp will appear on the panel. Remember, we wish to turn this LED on as the user presses the button, the user has no direct interaction with it.

Right click on the panel, select 'Numeric' and then select the first numeric design as seen below. This numeric presents a number in a simple manner. Remember, the number in this numeric control (you should see a default of zero) should show a different number when the user presses the button, but other than that the user has no interaction with this control.

This is how your panel should look now:

4th Step - Setting up the GUI, allowing it to interact with our code
As you might have noticed we didn't write any code yet, we will get around to it on step 6 (we only need to add two lines of code for our simple program to work correctly), but we first need to prepare the GUI for connection with our code and to understand how to address the different controls.
Every control placed on the panel and even the panel itself has a set of attributes. Some of these attributes are essential for the creation of the program. In order to view and modify some of these attributes we simply double click on the relevant control.
Double click on the button to access its edit window.

In this edit window you should be able to see many of the button's attributes, and we will encourage you to play with them later on, but for now let's focus on the upper left section called 'Source Code Connection'. This section includes two items: 'Constant Name' and 'Callback Function' and both of them are extremely important.
Notice that the 'Callback Function' item is empty (this will be the default for all the controls you add), but the 'Constant Name' is always defined. The 'Constant Name' is always unique and it is different for each and every control placed on the panel (you can try creating another button and see that it automatically gets a different constant name). The default constant name for the command button should be COMMANDBUTTON, what is the constant name of the LED and the numeric? The panel itself also has a constant name (double click on an empty area of the panel to access its edit panel) and its default should be PANEL.
But what does these names mean? and why do we need them? (see more on control names here) well, in order for our code to address and interact with a specific control on the panel, we need to know its full name. The full name of a control is a combination of its constant name and the panel's name - the full name of the button is PANEL_COMMANDBUTTON, the full name of the LED is PANEL_LED and the full name of the numeric is in our case PANEL_NUMERIC. Remember this names as we shall use them on step 6 when we write our code.
Before we move on to the next step we need to specify a 'Callback Function' for the button, we saw this item before in the 'Source Code Connection' section. Double click the button control and write "run" in the 'Callback Function' (see next figure). This means that in our code (we'll get to it on Step 5) there should be a function called 'run' that will run every time the button is pressed, the role of this function is up to us - we will write our code in this function to turn on the LED and change the number in the numeric. This is the way we respond to the user's actions - for every control that the user interacts with we specify a callback function, in which we write our code (the name "run" can be changed of course to any other legal name). Notice that in our example program the user only interacts with the button, we don't have to respond to any action he performs on the LED or numeric, so the button is the only control that gets its own callback function.

This step was rather long but all we did was specifying "run" as the callback function of the button.
Let's save our user interface file: Use the shortcut Ctrl+S (or use the File drop-down menu) to open the 'Save As' file browser. It is important to create a dedicated folder for your project's files, in the example we created a folder named "CVI Example" on the desktop and within it we saved the UIR as "example.uir".
5th Step - Generating the Basic Code
Now we create the basic code for our program - from the upper menu bar click Code->Generate->All Code. CVI will ask you to specify a target file, click Yes. In the 'Set Target File' window click OK. The next configuration window named 'Generate All Code' is very useful but for the moment let's just press OK and again OK in the 'New Project Options' window.
You should now see the new generated code for our program. We'll get into more details later on but take a minute and go over the code - notice that like all C programs our code has a 'main' function and the 'run' function we asked for on step 4 is right below it.

On the left side you can see the project-tree (see next figure) and you can use it to go between the GUI editor (double click example.uir) and our code file (example.c in our case).

Now let's save the entire workspace (we'll explain about workspaces later) using File->Save Workspace and save in the same dedicated folder we created before.
We can now test our GUI and code to check if everything is OK up to now, we will run the program as it is, without inserting any functionality into the button control, so don't expect the button to do anything when pressed: click the green arrow icon on the upper menu. The program should run and you should be able to move the window around, minimize and maximize it, press on the button and change the number in the numeric field - NICE! One thing you will not be able to do just yet is closing the window, since we didn't address this issue yet simply click the red stop icon in the upper menu bar of CVI to stop the program from running.

6th Step - Writing Code
Now that we have the basic code, let's add some functionality to the button, we will use the SetCtrlVal function (short for Set Control Value) to change the values of the LED and numeric as the button is pressed.
As we already mentioned before, due to the change we made on step 4, when the user presses the button-control the function 'run' is called and the code within is executed (you can read our previous post on callback function here). Go to the 'run' function in our code and add the following two lines inside the case within the switch structure as seen below:
int CVICALLBACK run (int panel, int control, int event,
void *callbackData, int eventData1, int eventData2)
{
switch (event)
{
case EVENT_COMMIT:
SetCtrlVal (panelHandle , PANEL_LED , 1);
SetCtrlVal (panelHandle , PANEL_NUMERIC, 77.77);
break;
}
return 0;
}
void *callbackData, int eventData1, int eventData2)
{
switch (event)
{
case EVENT_COMMIT:
SetCtrlVal (panelHandle , PANEL_LED , 1);
SetCtrlVal (panelHandle , PANEL_NUMERIC, 77.77);
break;
}
return 0;
}
As you can see, the second parameter entered into the function SetCtrlVal is the full name of the control we want to manipulate, you should remember those from step 4. The third parameter is the value we want to set: the first SetCtrlVal changes the LED to the ON state ( 1 is ON and 0 is OFF ), and the second changes the number inside the numeric to 77.77.
The first parameter of SetCtrlVal is 'panelHandle' (don't miss the capital 'H') this is a global integer that represents the panel itself and we will discuss it in another post.
now you can launch your program again (remember the green arrow) and check out the result. Try pressing the button... did it work? After pressing the button the LED should stay ON no matter what and you cannot turn it OFF, the number should change to 77.77 regardless of the number you place there (you can type a new number in and click the button again to see that).
This was of course a very limited and simplified application, but it is a solid first step. Congratulation on your first CVI application!
Stay tuned for a followup post in which we improve our first CVI application, and gain a better understanding of how CVI works.
Thanks! This is exactly what I needed. waiting for your next posts. nice site.
ReplyDeleteCarly
Great, but what should we do to turn the led on and off again?
ReplyDeleteTurning the LED ON and OFF is easy, you just have to set its value (using the SetCtrlVal function) to 1 or 0. I will demonstrate this in one of the future posts.
DeleteThis comment has been removed by the author.
ReplyDeletewhen i run above code i got below error...
ReplyDeleteerror: use of undeclared identifier 'PANEL_LED'
error: use of undeclared identifier 'PANEL_NUMERIC'
What would cause i am using same code?
My bet is that you accidentally change the constant name of the panel, so that its name is not PANEL anymore. Double click on the panel in the UIR editor screen and check its constant name. note that if this is the problem and you change it back to PANEL, you have to go through the c code and change it there as well.
DeletePanels 4-7 are missing/blank.
ReplyDelete